Showing posts with label websocket. Show all posts

Wednesday, 10 September 2014

A simple websocket client

As we discovered in a previous post, Qlik Sense Desktop communicates with the internal Qlik Sense service process primarily over the websocket protocol (WS) which as we saw can be readily inspected with Fiddler. For the curious among us, this brings within reach the creation of entirely custom Qlik Sense client applications to cater for special requirements and interesting scenarios. In this post, we're going to create the simplest example I can think of to set you on your own "custom client" journey. In this example we'll fashion a .NET Console Application in C# to request the list of documents held in Qlik Sense Desktop and display it in JSON format which is of course simply the raw response from the internal Qlik Sense service (I did say this was a simple example :) ).

This post assumes that you've the .NET Framework 4.5 and a C# IDE such as Visual Studio installed locally. If you don't have Visual Studio, you may want to consider downloading and installing the free Visual Studio Express 2013 for Windows Desktop. Once you've determined that you have everything you need, please follow the steps below.
  1. Create a .NET Console Application project in the C# IDE of your choice and call it "SenseConsoleApp".
  2. In the newly created project, create a C# class file labelled "SenseWebSocketClient.cs" and enter the following code:
  3.  using System;  
     using System.Collections.Generic;  
     using System.Linq;  
     using System.Net.WebSockets;  
     using System.Text;  
     using System.Threading;  
     using System.Threading.Tasks;  
     namespace SenseConsoleApp  
     {  
       public class SenseWebSocketClient  
       {  
         private ClientWebSocket _client;  
         public Uri _senseServerURI;  
         public SenseWebSocketClient(Uri senseServerURI)  
         {  
           _client = new ClientWebSocket();  
           _senseServerURI = senseServerURI;  
         }  
         public async Task<string> GetDocList()  
         {  
           string cmd = "{\"method\":\"GetDocList\",\"handle\":-1,\"params\":[],\"id\":7,\"jsonrpc\":\"2.0\"}";  
           await _client.ConnectAsync(_senseServerURI, CancellationToken.None);  
           await SendCommand(cmd);  
           var docList = await Receive();  
           return docList;  
         }  
         private async Task ConnectToSenseServer()  
         {  
           await _client.ConnectAsync(_senseServerURI, CancellationToken.None);  
         }  
         private async Task SendCommand(string jsonCmd)  
         {  
           ArraySegment<byte> outputBuffer = new ArraySegment<byte>(Encoding.UTF8.GetBytes(jsonCmd));  
           await _client.SendAsync(outputBuffer, WebSocketMessageType.Text, true, CancellationToken.None);  
         }  
         private async Task<string> Receive()  
         {  
           var receiveBufferSize = 1536;  
           byte[] buffer = new byte[receiveBufferSize];  
           var result = await _client.ReceiveAsync (new ArraySegment<byte>(buffer), CancellationToken.None);  
           var resultJson = (new UTF8Encoding()).GetString(buffer);  
           return resultJson;  
         }  
       }  
     }  
    
  4. In "Program.cs", delete all contents and enter the following:
     using System;  
     using System.Collections.Generic;  
     using System.Linq;  
     using System.Text;  
     using System.Threading.Tasks;  
     using System.Net.WebSockets;  
     using System.Threading;  
     namespace SenseConsoleApp  
     {  
       class Program  
       {  
         static void Main(string[] args)  
         {  
           GetDocList();  
           Console.ReadLine();  
         }  
         static async Task<string> GetDocList()  
         {  
           var client = new SenseWebSocketClient(new Uri("ws://localhost:4848"));  
           Console.WriteLine("Connecting to Qlik Sense...");  
           Console.WriteLine("Getting document list...");  
           var docs = await client.GetDocList();  
           Console.WriteLine(docs);  
           return docs;  
         }  
       }  
     }  
    
  5. Launch Qlik Sense Desktop so the local server process runs and can be queried by our console application.
  6. Now press F5 to run the application. After a short pause, you should see the list of your Qlik Sense Desktop documents in a JSON format.
    Console application listing the Qlik Sense documents

To summarise, we've sent a JSON command to the Qlik Sense Desktop's local server over the websocket protocol and retrieved the list of documents in a simple console application. The GetDocList JSON command we've sent is as follows:
 {"method":"GetDocList","handle":-1,"params":[],"id":7,"jsonrpc":"2.0"}, "requestPartCount": "1"}  
For other command examples I recommend that you use Fiddler to monitor the websocket traffic between the Qlik Sense Desktop client and the local Qlik Sense server process as described in this previous post and look at the JSON payload in the client requests. As for the technology you use to implement your custom Qlik Sense client, all you need is a websocket library and a JSON library. My background is in C# which is why I opted for .NET but you should also be able to do this in Java, Python and of course HTML5 to mention a few.

I hope you've found this stimulating. Thank you for reading.

Tuesday, 9 September 2014

Qlik Sense Desktop under the hood

OK, so you've been playing with Qlik Sense Desktop for a little while now, it's all pretty neat and you're getting increasingly curious about how it works under the hood. Let's see how you might go about investigating that.
  1. Launch Qlik Sense Desktop.
  2. Hit Ctrl-Shift-RightClick in the desktop client. You should now see a context menu with two interesting menu options i.e. "View source" and "Show DevTools".
  3. Select View source and notice that the source markup looks an awful lot like HTML5.
  4. Select "Show DevTools" and notice a typical browser deveveloper tools window opens in a new tab. In other words the presentation layer of Qlik Sense Desktop is actually a local web application. 
  5. So if this is a web application it should talking to a server process probably over HTTP. A good way to see this in action by using a HTTP Debug Proxy such as Fiddler. Download and install Fiddler in order to carry on with the next steps.
  6. Close Qlik Sense Desktop.
  7. Launch Fiddler.
  8. Relaunch Qlik Sense Desktop.
  9. You should now see a flurry of activity in Fiddler as shown below. You can select any line and view the HTTP requests and responses to and from the host (in this case "localhost") in Fiddler's Inspectors tab. The first call for /hub requests the HTML template or master page for the Qlik Sense app, subsequent calls are for CSS stylesheets, JavaScript and TTF font resources as you'd expect. But then you notice an intriguing "Tunnel to " HTTP request (see Fiddler line 8 in the screenshot below) which is followed by a request for "http://localhost:port/app/%3Ftransient%3D" returning with HTTP status code 101. 
    Fiddler capturing Qlik Sense Desktop HTTP traffic
  10. Select the request for "http://localhost:port/app/%3Ftransient%3D" and inspect the request/response in Fiddler's Inspectors tab (see screenshot below). Notice that the Qlik Sense Desktop client has requested a protocol switch from HTTP to the websocket protocol.
    Protocol switch request
  11. OK, we've just switched protocol but Fiddler only seems to be showing HTTP traffic... Fear not as a clever developer has already sorted that problem out at the CodeProject. Follow the steps carefully in that article to configure Fiddler to show websocket traffic in an intuitive fashion.
  12. Now close Qlik Sense Desktop and Fiddler.
  13. Relaunch Fiddler.
  14. Relaunch Qlik Sense.
  15. Now, in Fiddler you should see a large number of requests for the "fakewebsocket" host (see screenshot below). As you can see in the URL column these requests are distinguished between "Client" and "Server". In fact the "Client" requests represent the web socket requests from the Qlik Sense Desktop client and the "Server" requests represent the web socket responses from the local Qlik Sense server. 
    Websocket traffic in Fiddler
  16. Now as part of your exploration of all this websocket chatter, select the request for "http://fakewebsocket/WSSession23.Client.9". In the Fiddler inspector tab select "Raw" to view the entire request and notice that the body of the request looks very much like JSON. Therefore you may as well select the JSON option instead of Raw to display a nicely formatted view of the data. As you can see the Qlik Sense Desktop client is requesting a list of documents by invoking the method "GetDocList".
    GetDocList request
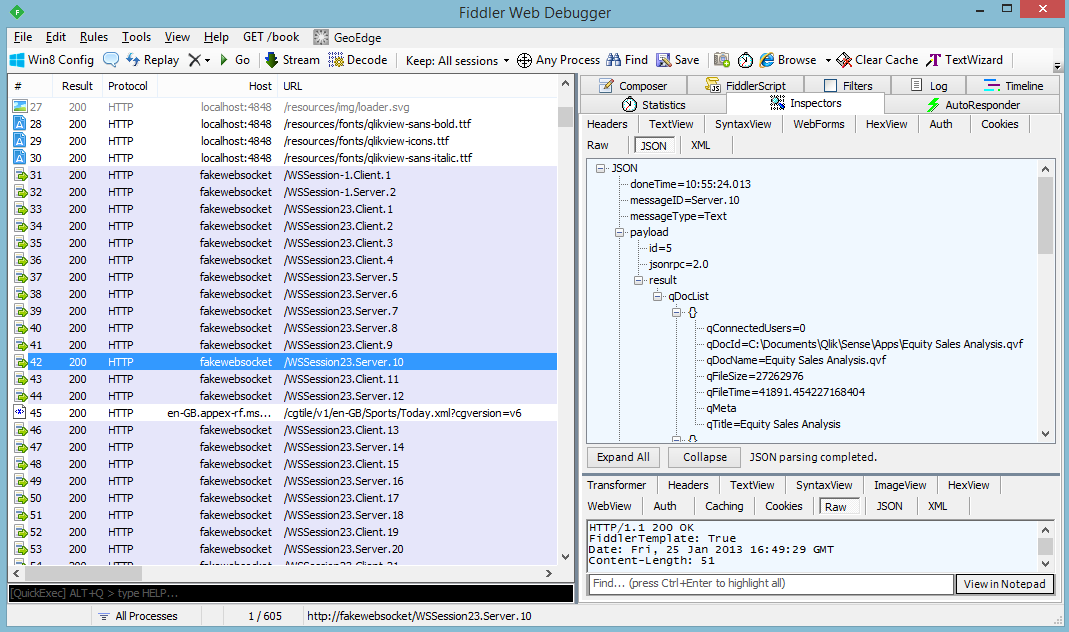
  17. Now let's look into the response from the server by selecting the request for "http://fakewebsocket/WSSession23.Server.10" and notice that the server has indeed responded with a list of documents which appear to be the applications you've previously created in Qlik Sense Desktop.
    GetDocList response

Cool, that was fun and interesting. So, how could we harness this newfound knowledge to create new and exciting things? That will be the subject of a future post. Thanks a lot for reading.